Editor Toolbar
A simple design, packed with features! A multitude of ‘contextual’ floating toolbar ‘pallets’ appear either on the toolbar or in the content window when the relative toolbar button is selected.
The editor toolbar ‘floats’ above your editor window at the top so it can always be close to your work.

On desktop browsers, hover over any button to see its name.
|
Opens the editor to full width of the browser window. Tip: Use your browser’s control to make the window the full size of your screen. May not be applicable on most mobile devices. |
|
Note that if the font selected here is not installed and configured on the user’s device, their browser will use a font of its choice. STRONGLY RECOMMEND that all content be ARIAL font as it is common to all devices and a very ‘clean and crisp’ font.
|
|
Size 14 recommended for most web text. You can set to other sizes not in the menu via the HTML Source Code. Note that the viewer’s browser may display at whatever size the user has it set to regardless of what you select here. |
|
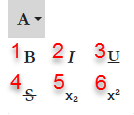
Style the text
|
|
Select tab first to choose whether changing the color or the text or its background. |
|
Examples: Ø , º , é
|
|
Selects everything in the editor window. |
|
Completely removes all formatting such as paragraph breaks, indents, bullets, etc. Typically used to ‘start fresh’ with formatting if you are having trouble applying a specific format function. |
|
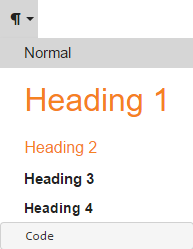
Highlight an area of text and select from the menu a format you would like that text to have. You can only select one of these formats, you can not customize them.
|
|
Left, centered, right, or justified. Note that ‘justified’ text may may display differently in the viewer’s browser. Alignment applies to images, videos, and other objects when inserted in-line with text. |
|
Hierarchical when indented. Example:
|
|
Hierarchical when indented. Example:
|
|
Move selected text left. |
|
Move selected text right. |
|
Inserts a horizontal line the full width of the page or table cell. |
|
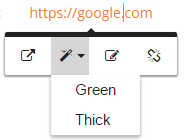
Makes the text selected into a link to another web page that will open in a new tab (viewer’s browser permitting).
In a different browser window or tab, go to the page you want to link to, select its entire URL (address) and ‘copy’ it. Back in your editor, select the text you want to make into a link, then click the Hyperlink button. In the “Insert Link” window, in the ‘URL’ input box, paste or type the URL you copied into the “Link URL” field. Scroll down and click “Insert” button. Option: Check 'Open in new tab' if you want the linked page to be opened in a new tab of the browser (viewer’s browser permitting). Text color and/or underline may appear differently to the Student as most browsers have options for how the hyperlinks appear. Some networks/firewalls may block the opening of certain or all hyperlinks. Check with your I.T. department if having issues with this. After hyperlink is created, when you click on it in the editor, a sub-menu opens with options to open the link, change its appearance, edit it, and remove it.
|
|
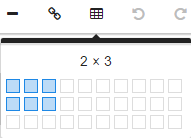
Use tables to create charts or put image, video, or other object beside text without the text wrapping around it. Drag right and down to select the number of columns and rows.
Click on a table and then click this button to open the Table Properties menu. To create a 2 cell table to put text on one side and an image or video beside it: Make table that is 1 row down and 2 columns wide. Tip: Use the “Quick Insert” editor tool to instantly create a table which is 2x2, 100% wide, and invisible borders. You can easily add or delete rows and columns. |
|
Lock table resizing, Default Large Size for Dual Size Images.
|
|
Undo last action (only actions since last page save). Option: Keyboard Command ‘Control+Z’ (Windows) or ‘Command+Z’ (Mac) |
|
Redo last action (only actions since last page save). Option: Keyboard Command ‘Control+Y’ (Windows) or ‘Shift+Command+Z’ (Mac) |
|
Embed an Adobe PDF document in page. User’s browser will need to have Adobe Acrobat Reader or similar plug-in installed and configured in their browser to view the document.Some networks and/or firewalls may block the document. |
|
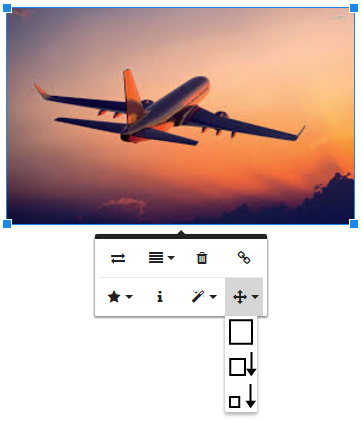
Add an image from your computer or the Media Library. ABOUT ADDING IMAGES: You can add an image from your computer to your page either by dragging and dropping it directly into the content page or by copying and pasting it. Note that ‘copying’ it from your computer will not always work in all cases. Use “Add Image” toolbar button if you want to add images from the Media Library or are using a mobile browser. To optimize for web use, the image will be automatically converted to a 72 dpi resolution .jpg with a maximum size 800 pixels wide and 600 pixels tall. If you have a larger image you need to display, use the “Add Dual-Size Image” toolbar button. Images will be added to your Media Library in the folder for the module you are working on (unless you add the image from the Media Library). Once an image is added, you can re-size it via the ‘Image Size’ button in the Toolbar (recommended), OR by clicking on the image and then dragging one of its corners, however this dragging method is likely distort and degrade the image, and making the image bigger than it was when inserted will reduce its resolution/quality. IMAGE PROPERTIES TOOLBAR: Click on an image to open the image toolbar and control image properties.
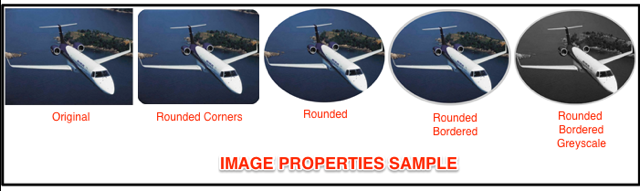
Replace: This is a quick way to remove the current image and put a different one in the exact same place. If new image is of different size, formatting may be affected. Image Align: This will set alignment for an image on a page or within a table cell as long as the image is not ‘inline’ with text. If it is inline with text, use the TEXT ALIGNMENT toolbar button. Remove: Does the same thing as if you click on an image and ‘delete’ it. Insert Link: This works the same as Insert Hyperlink for text (above) except the selected image, when clicked, opens the link. Display: Choose whether the image is to be placed in-line with the text near it (as if the image itself was a character in the text) or ‘break’ the text as a new paragraph and put the image there, separate from the text. How you align the image is affected by your selection here. If the image is in-line with text, then to align it use the Text Align toolbar button. Alternate Text: Also known as “ALT Text”. In most browsers, if you hover your mouse over the image for a couple seconds, a small box of text appears. Enter what you want that text to be here. Image Styles: You can make any combination of the first group of options, but you can only choose one from the second group. When wrapping text around image, note that the image itself is still technically all there in its squared form, but the rounded corners just hide some of the image. Quick Resize: You can only make an image smaller, but you can not make it larger than it was when inserted on page. Original: Make image its originally inserted size on the page, to maximum of 800 px wide X 600 px high. Medium: Maximum 600 px wide X 400 px high Small: Maximum 400 px wide X 300 px high
|
|
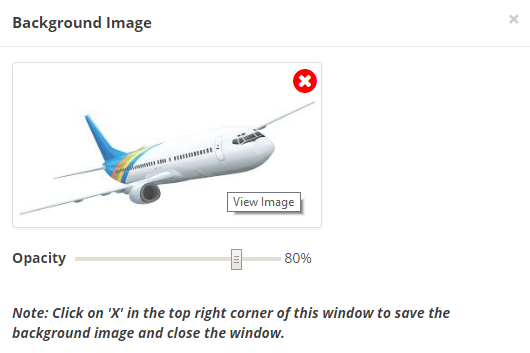
Click to add background image to the page. If a background image has been set for the whole Module (in Module Settings), click on the 'Delete' icon on the image to remove it first, then use the 'Upload' button to add the new image for the current page. The ’Opacity' slider adjusts the transparency of the image. It is common for background images to be about 20% opacity.
|
|
if you have a very large and/or highly detailed image to show, you can put a smaller “thumbnail” of the picture on the content page which, when clicked on, opens the full size image. Useful for things like wiring diagrams, schematics, complex charts, etc. All you need is that big image and the system does the rest.
With your cursor where you want the image to go, click the “Add Dual-Size Image’ toolbar button. Drag your image in or browse to it and add it. The system puts the large image into the Media Library and also makes a copy of it, which it optimizes for the content page by reducing it to a ‘Medium’ size image (max 600w X 400h) and puts it on the page. You can test the link between that image and your full-size one in ‘Preview’. |
|
For adding VIDEO or SOUND to a page. Click the button and you can then drag and drop a video of almost any format in, or browse to a video/sound on your computer. The window lists which formats are accessible. The system will detect if the file is a video or just sound, and make the appropriate player for it.
The file both goes into the Media Library and the streaming video system. The streaming system converts the video to a ‘streaming’ format. When a user opens a page with a video on it, the system detects the user’s internet connection type, speed, and browser; and then ‘streams’ an appropriately optimized version of the video/sound to them. This minimizes time to start playing and uses minimal bandwidth to deliver the best possible video or sound for the conditions. When you add your video, it will upload. Uploading may take up to a few minutes or more depending on the size of your video and internet connection speed. Once uploaded, it will embed onto the content page and begin processing. At this point, when you see it as a black box with a notice about processing, you can SAVE the page and carry on editing other pages. You can come back to this page in a few minutes after processing is done to see the video. Multiple Uses of Same Video: When you add a video, a copy of it goes into the Media Library in the folder for this module. So, if you will be adding this same video to several different pages in your content in this or other modules, you can eliminate the process of uploading the same video over and over. After you have added the video once, from then on when you click the ‘Add Media’ button, clic on the ‘Media Library’ tab and select your video from there. TIP: Set the Minimum Page Time to at least the play time of the video or sound so the Student can’t just skip ahead without letting the file play. |
|
Use this tool to embed video from an external source (ie: YouTube) to your module. You have the options to either embed the video by using the URL or Embedded code (ie: Vimeo).
|
|
Use this tool to record a voiceover for the module page.
|
|
Use this feature to import an entire ‘module’ (folder) of ‘SCORM’ content exported from Adobe Captivate, Articulate, or iSpring (contact us if you have content from other software products). This will go into your module as a ‘page’ in the navigation. Note that this will play / run within that page of the browser and will not interact with other features. Important: 1. The folder being imported must be a ‘zipped’ folder. This will be a folder with “.zip” file extension. Most e-Learning systems and software applications which export content will export it this way. 2. The system will recognize content folders containing one of the following ‘player’ pages: index.htm , story.htm . If it has another type of player page, you can send to us the zipped folder and we will insert it manually for you (email it to support, or contact us for DropBox instructions if large file). If you are not sure about the player file, send us the file to look at and we will advise you. 3. If you are unsure about the type of player file, please send the file to support and/or contact us FIRST. Do not repeatedly try uploading. |
|
This appears only here and only to the Training Developer. Example: “Get photo of generator from Rob for this page.”
|
|
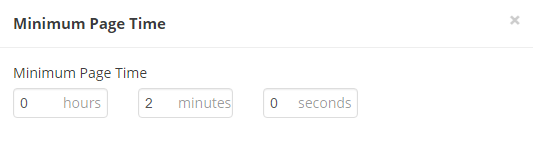
Strongly recommended when there is a video or narration on the page to keep the student on the page for the full play time. The remaining time will display to the student in the page menu bar.
|
|
Any attachment(s) will be shown to Student in a list form at the bottom of the page. A few suggestions: Save your attachment files in a common web-compatible format like PDF. If your file is .doc, .ppt, .xls, or other desktop software file types, the viewer will likely not be able to open it unless they have that software program installed, and they likely will not be viewable on mobile devices. Try to optimize your file for minimum file size. Large files (over about 250kb) may be difficult for Student to download or incur costs when on a cellular data network. Large files may also be blocked by a network and/or firewall. Scan your attachments for viruses before uploading. If your attachment contains a virus, it can affect all Students who open it. You will need to use the “+Add” button for each individual attachment. Note that some networks and/or security firewalls will block certain types or all attachments. Check with your I.T. department if having issues. If you are going to add a particular attachment to several pages and/or modules, upload it to the Reference Library first and then add the attachments from there to avoid it having to upload over and over. Note that all attachments will go into the ‘Document Manager’ where they will be accessible to all your Students unless the Registrar has hidden the library from Students. Attachment file names must be common characters only and must not contain any special characters other than “ _ ” and “ - “
|
|
This opens a window showing the HTML code for the page. This is most commonly used when pasting in ‘Embed’ code from YouTube video. Other uses include adjusting size of images and videos, fine tuning formatting, and adjusting table settings. For more on HTML code, do a web search for ‘HTML Basics’. This is also handy when copying and pasting all the content on a page to another page in another module. It works better if you open the HTML code, select ALL, copy that code, then on the new page you open its code view and paste the code in there. That does a better job making exact copies of the page content. You will not have to re-insert images, video, or sounds; but note that if you move, rename, or delete the image or media file in the Media Library, it will affect all the pages you copied it to. |
|
Click on this icon to preview the current page/exam as a student. The page preview gives you the exact view a student would see for a page. To CLOSE the page preview, click the special ‘Exit Preview’ button in the Preview window menu. |
|
Opens the Help Library Please refer to the ‘Help’ library at the top of the Training Developer ‘Home’ page. |


HEADER AND FOOTER: his applies to the ‘Custom Module Header & Footer’ that is set up in the MODULE Settings. IF there is a Heater and/or Footer set for the module, then this toolbar button enables you to turn those OFF for that particular content page you have open, basically ‘overriding’ the Module Header/Footer for a page.
Note that Headers & Footers display to student ONLY on Content Pages, not on Exams, Review Questions, or Surveys.

For questions and technical assistance, please submit a support request via the button at top right of the Training Developer’s menu.