Bulk Student Enrollment
To enroll large numbers of NEW Student users into your system in one simple process, you can import a data file of the users. The system will even assign the new Students to their Student Group(s) in this process.
STEP 1: TOKENS & STUDENT GROUPS
- Check to see if you have enough available Student Tokens in your inventory. If not, submit a "New Tokens Request" in the Registrar/Tokens tab.
Refer to the Managing Your Token Inventory OR the Order More Tokens Article
- If you are using Student Groups (which will enable you to do several things including bulk assignment of training to groups instead of each person individually), you MUST set up all your Student Groups in the system FIRST so you can enter the Student Group ID number(s) in the spreadsheet. Do this in Registrar / Users tab / Students / Student Groups
Refer to Put Students into Student Group(s) Article on how to set up all your Student Groups
STEP 2: CSV FILE
- Create a “.csv” file with your bulk enrollment data in it. A “.csv” file (“Comma Separated Value”) is a universally standard computer file containing text data sorted in a standard way that can be recognized and used by other databases/programs.
- USE SPREADSHEET TO CREATE .CSV FILE:
- You can use this TEMPLATE SPREADSHEET for Microsoft Excel, or create your own from scratch by launching your spreadsheet app (Microsoft Excel, Apple Numbers, etc.) and create a ‘new’ file. If you need to stipulate the number of columns, it’s 6. If you need to set the number of rows, it’s however many students you are importing, plus 1.
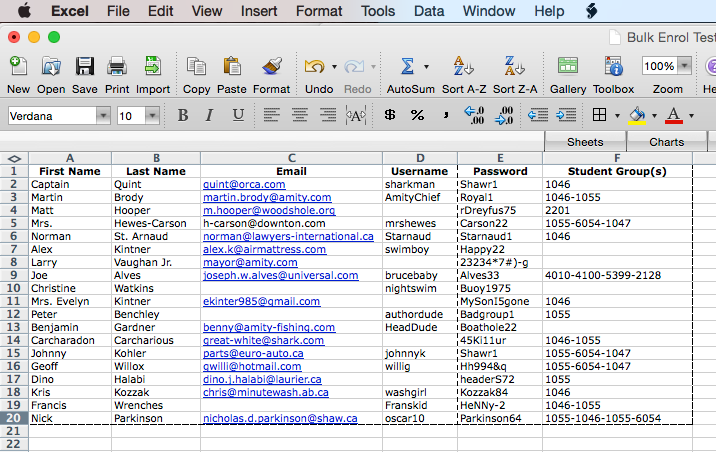
The columns & requirement for each are as follows (Image example provided below this page)
| First name | Required |
| Last name | Required |
| Not required IF there is a Username in next column. Email must be unique. | |
| Username | Not required IF there is an Email address in previous column. Username must be unique. |
| Secondary ID | Not required. This is like a ‘unique nickname’ for a user that can be shown in reports and training records. |
| Password |
Required. It must adhere to the specified password requirements. Requirements: Minimum 6 characters, 2 letters, 1 number, 1 different case letter, basic special characters (i.e.: ! @ # $ % ^ & * ?) but no slashes or braces. Examples: Apple2, eaTing77, 1944Ford, 2f%gWw#bN, A12983a). |
| Student Group(s) | Not required. Enter numerical Student Group ID number. Found in Registrar/Users tab/Students/Student Groups. Separate ID numbers with hyphens. Example: 1046-2129-11029 |
- The first row will be ignored by the system. You can leave it blank or put the column names (First Name, Last Name, Email, Username, Password, Student Groups).
- Starting on the second row, enter the info of the users to be enrolled. Use only ONE row per Student users. Leave EMPTY any cells you do not have info for, if that data is not required.
Note: Avoid entering extra spaces, especially when copying and pasting data into the form. An email address with a space at one end may not show on the screen, but that space will make the email address invalid.
Here is a typical spreadsheet ready to be saved as a .csv file:
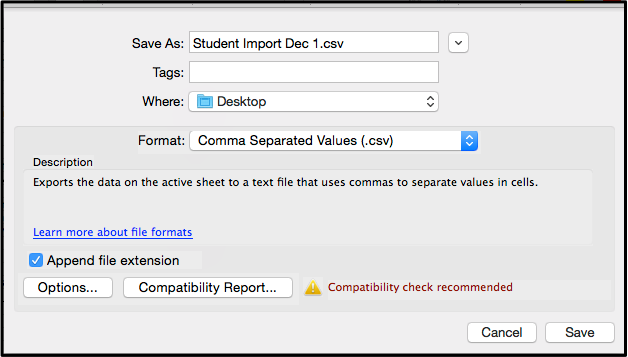
When all are entered, go to File menu and select Save As, and under the Format options, select "CSV". Give it whatever name you want (i.e.: “New_Students”) and tell it where to put your file. The file look something like “New_Students.csv”. Note that the file extension (“.csv”) may not show, depending on how your computer is set up.
OR CREATE DATA FILE FROM DATABASE OR OTHER APPLICATION:
Referring to the instructions for your database / application (HRIS human resources info system, employee scheduling system, etc.) to export a .csv file with the fields and format described above.
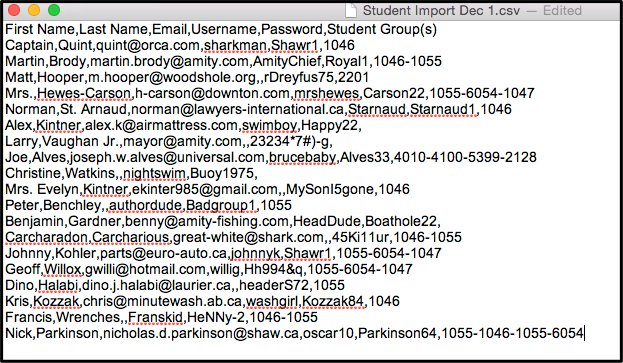
Here is what that spreadsheet looks like when exported as a .csv file (opened with a text editor app):
STEP 3: IMPORT YOUR DATA FILE

In REGISTRAR, click Users tab. In the Students Page, you will see the ‘Bulk Enrollment’ button. Click it. There are 3 steps, which are self-explanatory as you go through them.
Note: If the system detects errors with your data, it will abort the import and give you clear instructions on what you need to fix. Once fixed, start over at the Bulk Enrollment’ button.
Once completed, you can go back to the Students list and assign them their training (Actions menu / Manage Training) or you can bulk assign training by going to Student Groups and then Actions menu and Assign Training.
Please contact support@aeostudies.com if you encounter any issues during this process.